Sunday, June 16, 2013

DIY Cake Stand Soap Holder


A little while ago I stumbled across this nifty, little DIY craft.


It's so cute right?! Totally genius. The soap containers always make rings on the sink, and sometimes they get kinda icky. So I tracked down the blog to figure out exactly how it was put together. I should have been a detective. 

Turns out....it's not that hard! 
I didn't have a random candlestick just hanging around though. Or a plate I could glue to said imaginary  candlestick. So I browsed Targets lovely clearance section.

I'm picky though. I wanted it to be cute. I ended up buying a $9 candle stick, and a $3 plate.
Oh, and some spray paint. I think like $4. I think that's a pretty cheap craft. 


It was originally black. So I made it purple! I'm in love with that Rustoleum stuff. It's the best spray paint EVER. I spray paint everything. 


I waited oh so impatiently for it to dry. It took awhile because of the little groves. I had to turn it upside down after the first coat and do a second to get all the spots. Then I put LOTS of hot glue on the top of it, and yes, stuck the plate on. I even squished it down. 
I know. Amazing.


I'm on the hunt for a pretty little towel, and some cute matching soap dispensers. For now though, I think it's pretty cute!

I'm sooooo crafty! 

Thursday, June 13, 2013

Adventures of a little pup!


My little pup is growing up! This week he is just shy of 5 months old, and weighing in at 40lbs. I feel a little sad at the loss of a tiny, floppy eared pup...... butttttt.....
 I LOVE that he's getting big enough to have adventures with me. 

This week I took him to the dog park for the first time. He found a friend who was just right to play with, and for a good 45 minutes I couldn't even catch his attention. Daegan really loves all dogs. All people too. Poor guy is always trying to find someone, anyone, to play with him. I'm considering training him to be a therapy dog. He's that loving to everyone.


On Tuesday we set out on our first BIG adventure. 
I was headed on a 6 mile round trip hike to what the locals call University Falls with a bunch of friends. It's a set of natural water slides and little pools. Some are pretty stinkin steep! I couldn't go without the pup though, four other dogs were going! I knew he'd love it. 

Now, up until now, we have never walked more than a mile. He's gone maybe two with Dad. But I couldn't stand to leave him behind. I was prepared to walk behind the group with him on the leash, and take rests when he needed them. Less than a minute into the hike, I knew the leash had to go! He was pulling to catch up to the other unleashed dogs, and he's so STRONG already! 
He was going to take me down. It was seriously only a matter of time.

So....

YUP
I unhooked the leash
and prayed. 


He ran ahead to play, of course. About every 2 minutes he circled back to check in with me. A behavior I seriously encourage. His teenage time really hasn't been that bad. He was so amazing. 

Off the leash the entire time. 
He kept up with the big dogs all the way there, and all the way back.


He sure was tired at the top of the falls though! 
He napped for about 3 hours up there while I went sliding and hung out with my friends. 
Ok.
So we napped together for part of the time. 
I like naps.
Who doesn't like naps?!


He looks like a wolf pup on the prowl. I'm so proud of my little pup, and his big pup adventures!


Monday, June 10, 2013

Strawberries!


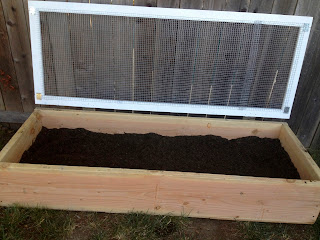
Awhile back I ordered strawberries from Stark Bro's nurseries, and had it in my head to build them a raised bed. I'm quite running out of room to grow all the things I want to grow, and raised beds are the perfect solution!

When I realized my berries would be here by last wednesday, I had to put that bed together quick! Josh and I headed to Home Depot with a quick sketch I had done of what I wanted. 

* Two 8ft by 2ft boards
* Wire
*Two pieces of framing wood
* Staple Gun
* Nails
* Hinges
* Plywood


I cut the 8ft boards to 6 feet, and used the remaining pieces to make the sides. Plywood makes up the bottom. I framed out the top after I painted the pieces white. I like pretty!
They were also 8ft long and I did the same thing of cutting them to 6ft and using the 2 ft left overs for the sides. 
I wish my instructions were a bit more technical. I really just kinda make things up as I go along. It's a lot of trial and error, and of course the right size board! My Ryobi power drill is probably my most favorite thing. 
Looking closing you can see where things aren't perfectly aligned. I'm no master carpenter! But it works for me =)


I used the staple gun to get the wire onto the frame, and regular door hinges to attach it to the bed. We have birds and squirrels in the area who I know would just LOVE to get into those berries. 


I filled the bed with potting soil, compost, and chicken manure. The strawberry roots arrived looking VERY STRANGE to a rookie gardener. They were just the root with a little nubbin on top! I had to soak them in water for about 3 hours and then I planted and prayed. This is about 5 days later, and leaves have sprouted! 


Of course I wanted things to be pretty. So in addition to painting the lid frame white, I ordered a strawberry cabinet knob offline. I know, it's totally silly. It needed a little touch of me though!


Yay berries!

You know what else would be great?! If you followed this blog! =)

Sunday, June 2, 2013

Seeds!


Getting things in the mail is the BEST! 

Anyone feel especially excited by this? I mean, it's usually junk mail or bills. So getting fun things in that mail box just perks up my day!

Seeds from the Baker Creek Heirloom Seeds came the other day. I popped into the front yard to survey the boyfriends yard work duties, and saw an envelope from them. yard work surveying was promptly put on hold =) I had ordered broccoli, a fun white summer squash, tiny melons, hot peppers, and morning glories for my front yard. 

I also got a free gift of red romaine seeds! Free gifts make me smile.


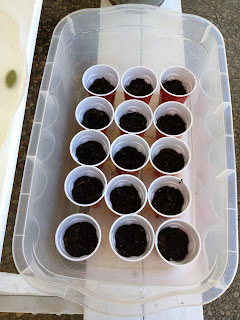
I abandoned the seed starter kits I bought. They just didn't allow the plants to get big enough to realistically transplant. I have an empty planter right now and so I added some chicken manure and compost, mixed it up, and added it to my red solo cups! I started at least 3 of each plant and put them in to a plastic storage bin to serve as a green house. I'm winging it here so I hope this works!


Later on I had to add 2 watermelon seedlings to the bin. Daegan dug them up while I was building my sweet potato hills. He is such a ninja dog when he is up to naughty stuff. I never even noticed him. The root systems were pretty mangled, so I popped them into cups to try and salvage them. Here's to hoping! 


Sweet Potatoes


This year I really wanted to grow sweet potatoes! They aren't grown from seed potatoes, but from "slips". Little sprouts with roots that grow off the potato. It seemed difficult to do that myself, so I ordered a 12 pack from Steele Plant Company.  They have a great website with lots of varieties to choose from,  growing tips, and even recipes! They ended up sending 15 plants instead. Nice little bonus. They came in that little box with the roots wrapped in wet moss. So crafty! It said to get them planted ASAP, so I set to work.


I put the plants in a area where I was going to grow pumpkins. I dug out the sprouts because I decided to order an organic seed pack so I could harvest the seeds for next year. So I re-tilled up the area, added some chicken manure and extra dirt! 

I needed the extra dirt for building the little mounds. I think they should be a few inches higher, we'll see how this works. I did mine in two rows of 7 plants each. One little guy had a pretty poor root system so he went into the compost bin. But hey, I still had 2 extra plants!

 I dug an area in between the mounds I could fill up with water. Days get up to 110 degrees yikes! in Sacramento and I wanted to be able to water without scorching them.


I cut a bamboo stick to measure the spacing between plants, and then to dig out the side of the mound. I laughed at myself after trying to dig a hold with the bamboo. I couldn't make it deep enough, and just kept ruining the mound. 


It made it MUCH easier to just slide the plant in and reform the mound around it. Oh I am such rookie gardener! =) haha


They are a little weepy =( I think it's from the shipping, and it's also been 90+ these last few days.  Hopefully in about 3 months we'll have sweet potatoes!


I also saw my first honey bee in the squash patch! So exciting to see bees and flowers popping up on plants I started from tiny seeds =)

Wednesday, May 29, 2013

Go away bugs!


I love to sit on our patio. LOVE. I have spent countless hours and dollars making it a haven, and I spend most of my time in our backyard. It has come a long way. When I moved in with Josh the only things in the back were two old couches I swear were left over from his days at Davis. 


I even bought a picnic table. I put that thing together, sanded it down, and painted it white to match the rest! I added pool chairs and lounge chairs and tiny tables. That green bench in the background? I refinished that as well. 

It would be such a nice place to sit and relax if it wasn't for all the bugs! Mosquitoes, flies, little knats.... I hate them all. I don't want them in my food, my hair, or on my skin. So naturally I bought some citronella candles. I lit those babies up! I noticed a few days later the bug problem hadn't really been resolved, but my yard sure smelled like those candles. Turns out, most of those commercial candles DON'T really have essential citronella oil in them! They are simply scented and sold at a high price.

So I returned them. Ordered essential oil ($20-I bought other scents) Brought out a few canning mason jars and candle wax ($10ish at Michael's), and set to work. You can also melt the remaining wax in candles around the house and add it to your mixture.


I cut the wax into smaller pieces so it would melt easier. I used a double boiler and poured the hot wax into a glass measuring cup to make pouring easier.


 I used hot glue and pens to keep the wicks in place. 


They aren't this bright in person. I added citrus essential oil as well to make them smell a bit nicer. It gives it a yellow tint. Some batches were darker. I don't measure =)


I think I'll add the twine stuff to them all. They are cuter than store bought, and the smell is somehow nicer!


Daegan was very interested in the smells coming from the kitchen. He sure did want to be right in the thick of it!

Tuesday, May 28, 2013

Night Crawlers!


One of my most favorite blogs are gardening blogs. More so, the blogs where the write has a full blown farm! I dream of a bigger space where Josh wouldn't even notice chickens, more dogs could run and play, and I could plant all the things my little heart desires. One of these blogs is Hickery Holler Farm. It's SO much fun to read, and they sure seem to have everything on that place! 

A Holiday Weekend to Remember, her post today, was about the rain storm they just had and how it affected her plants. I sure do take our mild weather and climate here in Northern California for granted!  One of the photos she posted had all these little worm highways from when they had come up after the rain. It occured to me, I have NEVER EVER seen a worm in  our backyard! Not after the heavy rains of winter, not after we tilled up extra soil, not after we mixed in manure, just never.

That just can't be normal. I remember seeing worms come up after rains my entire life. My parents always had lush grass and gorgeous backyard veggie gardens. My mother can grow flowers people will tell you are impossible to grow out of their native regions. Yet, I can't the new rose bushes to look healthy. The grass is patchy and the seeds are not setting as well as I would have thought. The ground is dense and hard in a way that makes no sense. 

So it can't hurt, I ordered worms! Online ordering is my extreme addition. There is just so much more available! I chose Uncle Jims Worm Farm and did a little research on the best type of worms for a yard and garden. His website also gives great little descriptions. 


I settled on 250 "super reds".  I'm not sure if this amount is enough for a yard my size. I plan on distributing them to all areas and hoping they get down to some worm reproduction. We'll see if it helps the yard! 

Organic all the way!


This is my first year gardening, and man o man making decisions about feeding my plants has been harder than I thought. Those little flashy green packages of Miracle Grow sure do talk a good game on their package, and a few other brands swear they will make awesome veggies. I'm a reader though, and so I dug a little deeper. All those fertilizers, fungicides, bug killers, etc. ALL seemed to have intense warnings for me to NOT consume them. Don't get them on my skin, don't ingest them, don't let it touch my eye. Excuse my french, but my first thought was 'what the hell?!' How can I possibly use these on things I am going to EAT?! 

So I set out to find a better solution. Compost and manure seemed to be the place to start! When I tilled up my garden areas I did add gardeners compost soil to help it out, but it just didn't seem to be enough. So before the rains over took Sacramento yesterday, I got up early to feed the soil. 


The extra bags didn't get unloaded from the garage until I realized how much I'd need! I mixed composting soil and chicken manure together and set out. I covered all garden area's in about 2 inches of the mix. After I was done I took my little gardeners hand rake and loosened soil around to help it settle. Then I let the rain we had for about 12 hours do the rest! I hope all those good nutrients sink right down and help out! 

The backyard DOES smell like the inside of chicken coop, and the pup is fascinated by this! He has eaten a good amount of chicken poop dirt haha. I'm not to worried, he seems fine =) I do hope the smell fades a little. It's not helping my case with Josh on how much I need backyard chickens!


You'll notice from earlier photos how much darker the soil is! It's not just how wet it is, that compost/manure mixture sure was rich! My cucumber trellis is back there, and you'll notice a few plants big enough that I have started to train up. I just use that green gardeners tape that is stretchy and doesn't hurt the plant. It's pretty sturdy stuff!

What are you doing to help your garden along?

Sunday, May 26, 2013

Wedding Weekend!


This last weekend Josh and I went to a wedding in San Ramon. His friend Nick from college got married so we made a weekend of it! It was so nice to get away from work and everyday things for awhile. We had a great time laying by the pool and relaxing with new friends. Josh was in his element with all his football buddies from college, and we danced the night away on Saturday. 

My little sister and Mom watched the house for us. I sure missed my puppy and my garden! Sleeping in past the 6:30am puppy wake up call is something we aren't used to anymore, and even though I missed him, it was nice to have to just the two of us. I wonder if parents feel this way haha! 

While we were gone my cucumber trellis ordered from the Gardeners Supply Company came and I sure was eager to get it put up and the cucumbers transplanted! I tore into that box within 30 minutes of getting home. It was a breeze to set up, and I got my cucumbers planted! I put in a new row of seeds for pickling cucumbers, can't wait for those!


Here are a few weekend pictures!


Thursday, May 23, 2013

My little garden


This year I decided I would have a garden. And why not? I have a nice sized yard. I have planting barrels. Seeds are easy to buy, it can't be that hard. Right??

I'm sure any experienced gardener will have a chuckle at that. It's much harder than I ever thought it was going to be! Like anything I start, I tend to do a bunch of research first. I started with what grows best in my area, and popped into a few farmers markets to see what they were selling. After that, I marched myself down to home depot and loaded up my cart. I started with TONS of seed packets, potting soil, mulch, tools upon tools, and a few kits on how to start seeds inside. 

A few things I have learned:

*The seed starting kits are NOT amazing. They are so tiny that the seeds don't get big enough to transplant, and a lot of mine ended up dying. 

*Real leaves need to develop before transplanting, and the plants need to be hardened off. 

*Starting the seeds in plastic cups with good soil seems to work so much better. I have re-started a few plants this way. I am fortunate to live in the central valley, where our frost wont hit until late November. I have a long growing season!

*Seeds. All about seeds. Next year I'll be buying organic seeds from seed companies. I didn't realize the kind sold in store are NOT meant to produce viable seeds, and aren't organic. I love these two companies websites Baker Creek Heirloom Seeds  and Stark Bro's Nurseries and plan on ordering from them next season. I did order my strawberries from Stark Bro's. When they arrive and are planted I'll give you an update!

I planted A LOT of my veggies in barrels that sit on one side of my house. The rest I took over areas of the yard! I sectioned myself out a 6 foot by 6 foot plot in the corner of the grass. I ripped the grass out by hand, and roto-tilled in manure and soil. I did the same thing for the side of the house. That area had to be cleared of weeds and rocks, and took more soil and manure. It was literally ROCK hard!

 The little fence serves as a marker of where the garden starts, it's pretty, and it gives my demon dog a visual barrier. He KNOWS he isn't allowed inside, and will sit and whine while I weed or tend. Once I'm on the other side of the yard though, he sure tries to sneak in! He loves to eat the leaves!


Here is my section in the grass. I ended up having to re-seed the grass on the other side of the little fence, as I kinda killed some of it in the process. For now it has green beans, tomatoes, and an assorted squash area. I'll be transplanting cucumbers once the trellis arrives =)


This is my stolen side yard! A much better use of space than rocks and weeds! Here I've planted rows of corn in the back. There are seeds planted in between so they grow at different times. This hopefully will help with pollination. There are also pumpkins, cantaloupes, and watermelons. I plan on training the melons up a trellis to space save =) Next year I'm hoping I can convince Josh that a plum tree behind the air conditioner would be an awesome addition. Plum jelly is a family favorite, and Grandma's recipe is 5 generations passed down. 


Lastly, I have 7 of these barrels and plants are in each! Here is my snow pea barrel. They are growing along nicely. I also have sugar snap peas, carrots, onions, hot peppers, and bell peppers. Cucumbers are growing in a barrel as well awaiting transplant time.

What are you planting this year?

Have any tips to share?! 


Wednesday, May 22, 2013

Fresh Start


 I have always wanted a German Shepherd Dog. Ever since I was a little girl and I rode on the back of my Grandpa's, Misty. I thought she was the greatest dog in the whole wide world. This thought has never left me =)
Last year in April while I was at the beach in Lake Tahoe, I fell in love with a little ball of all black fluff. I was SHOCKED to learn it was a pure bred GSD. I had never thought of them as all black, didn't even realize they could be. So my research (obsession) started and I found myself ordering books and looking into breeders. After about 2 months and a spread sheet of answers back from about 8 breeders, I had it narrowed down to 3 Northern California breeders all with dogs I LOVED. I had made quite a list of criteria to meet! I found that I preferred "straight-backed" GSD's and that research was saying it was closer to the original breed and better on their hips and joints. The breeders I found also all had solid black dogs being produced in their lines. The all black coloring is true to breed and AKC approved for all types of showing. Timing of the litter is what led me initially to Spragues German Shepherds I then fell in love! Her website is amazing, she is prompt on e-mails, and best part?! The facebook page. Where people from every litter past are friends and share photos and updates on their dogs. It was the best feedback I had ever found. I could actually message and ask people, and not a single one was unhappy with their Sprague GSD. His litter is Fancy x Elvis, and I put the deposit down and prayed an all black male would pop up on birthing day. My Daegan, meaning black haired in Irish, was born on January 30th 2013. I love the mess making trouble maker! He has a white blaze on his chest and tip of his tail =)


The collage: 3 weeks, 6 weeks, 8 weeks, and 11 weeks!


Today 5/22 Daegan is 16 weeks! He's officially a teenager, let the intense teething and wild child phase start!